
 0
0
You can set custom MX entry for your domain with cPanel. This is done to set mail server of your domain to a remote server.
1) Click on “MX Entry” under the Mail area in cPanel.

2) For MX Entry Choose the option “” under email routing.
Click on the button “Change” to save the settings.

3) Under Add New Record, set the priority for the new MX Entry (Lower values denote higher priority,0 is the highest priority).
Add hostname of the new mail exchanger in the text box “Destination“.
Click “Add New Record” to store the changes.

4) Existing MX Entries are seen under ” MX Records“. You can edit or delete these MX entries.
![]()
Email filters can be set on cPanel, with which you can filter the unwanted mails from a specific sender or with a specific subject.
1) Account Level Filtering
With Account level filtering we can set common mail filtering rules for all email accounts on the account
To add an Account Level Filter, Click on the “Account Level Filtering” in the Mail area.

Click “Create a New Filter”

It will go to “Edit Filter for All Mail On Your Account” as shown below.

a) Desired rule name on , “Filter Name” field
b) Select an item from the combo box under Rule, here you can specific the parameter that you want to filter
c) Select an operator from the second combo box under Rule.
d) Enter the any characters or words in the text box for filtering, here you can give the exact content that you want to filter
e) You can add and remove rules by clicking the + and – buttons.
f) Select a function from “Action” combo box. here you can set an action to discard or route the mail.
Click “Activate” to save the settings.
Created Filters can be Tested using “Filter Test“.

Type a test email message in the text box. Click on “Test Filter“, test result will be shown.
2) User Level Filtering
As the name suggests with user level filtering you can set email filters for each email account.
1) Click on the “User Level Filtering” in the Mail area.

Select a user from the User list.

Click “Create a New Filter”.

It will go to “Edit Filter ” as shown below.

a) Desired rule name on , “Filter Name” field
b) Select an item from the combo box under Rule, here you can specific the parameter that you want to filter
c) Select an operator from the second combo box under Rule.
d) Enter the any characters or words in the text box for filtering, here you can give the exact content that you want to filter
e) You can add and remove rules by clicking the + and – buttons.
f) Select a function from “Action” combo box, here you can set an action to discard or route the mail in wanted way
Click “Activate” to save the settings.
Created Filters can be Tested using “Filter Test“.
Type a test email message in the text box. Click on “Test Filter“, test result will be shown.
WebDisk allows you to manage files associated with your website using your operating system’s interface. You can navigate, upload and download files to and from your web server through Web Disk.
1) For creating a Web Disk , click on “Web Disk” under Files section on your cPanel.

To configure a Web Disk

a) Enter a username in the Login field.
b) Enter your desired password into the Password field. A password generator is their to generate a strong password.
c) Specify the directory to which that you want the webdisk to startup.
d) Click on the button “Create” to save the entire settings.
On the next page, you can select the operating system and you will get clear instructions to set webdisk for your OS

a) Choose your operating system (OS), Windows, Mac, or Linux.
b) Click “Go” under the appropriate operating system to download the script file.
c) Open and run the script file.
When the Web Disk configuration is completed successfully, a new window containing your website’s content will be opened on your computer.
2) The existing WebDisk Accounts can be seen under “Web Disk Account Management”.
There are links to change password and delete a webdisk account in WebDisk Account Management.
![]()
The Backup Menu under cPanel files section allows a user to backup or restore all or parts of their account.
1) Click on Backups in the Files area.

2) Click on “Download or Generate a Full Website Backup”
A full backup includes all of the files in your home directory. This backup can be mainly used to move your account to another cPanel server.
![]()
You can specify the back up destination with “Backup Destination:” drop down. Backup can be placed in the homedirectory or send to a remote server with the options you specify.


3) For Partial BackUp’s.

a) For Only Home directory backup, click on the button “Home Directory”.
b) For MySQL database backup, click on the button “Databases”.
c) For Email Forwarders backup, click on the button “Forwarders“.
d) For Email Filters backup, click on the button “System Filter Info“.
4) Restore a Backup
This feature allows you to restore files and databases separately.

Restoring options is under Partial Backups
a) First one is to restore a home directory backup. Define where the backups should be stored by clicking the button “Browse“. Click the button “Upload” to restore the home directory backup.
b) To Restore a MySQL Database click the button browse under “Restore a MySQL Database”. Click the button “Upload” to restore the MySQL Database.
c) To Restore Email Forwarders click the button browse under “Restore Email Forwarders”.Click the button “Upload” to restore the Email Forwarders.
d) To Restore Email Filters click the button browse under “Restore Email Filters“. Click the button “Upload” to restore email filters.
Email Delivery Route option is to verify specific path that will be taken by an outgoing message when send from the server.
1) Click on the “Email Delivery Route” in the Mail area.

2) Enter an email address in the text box to see the delivery path

click “Show Route”
3) An Example of Email Address Trace is shown below.

Mailing lists can be used to send messages frequently to a large amount of
people for things such as newsletters and product updates.
1) Click on the “Mailing Lists” in the Mail area.

2) Add a Mailing List

a) Enter the “list name” in the text box.
b) Give a secure password.
c) Click “Add Mailing List” to create the new mailing list.
To modify and add email addresses to a list, click on “modify“.
![]()
Autoresponders can be used to send a message back automatically to anyone
who sends an email to a certain account.
1) For creating / deleting a auto responder , click on “Auto Responders”.

2)Click “Add Autoresponder” to create a new / edit auto responder.

By clicking this you will get a section like below. You can customize auto responder in this section.

a) Choose a “character set” from the drop down list(You must select this option before changing anything else or you will lose your changes).
b) Specify the “Interval” (In hour),after this interval only auto responder reply to the same email address.
c) Define the email address whose mail you wish the system to respond to.
d) Enter your name or address in the “From” field.
e) Enter the subject line of the autoresponder in the “Subject” field.
f) Click the “HTML” checkbox, if you want to include HTML tags.
g) In the “Body” field, type the text of the response (Tags also be included).
h) Select a start time and stop time
Click “Create/Modify“ to store the new autoresponder.
With “Default Address” any e-mail that is sent to an unknown email account at your domain name can be automatically rerouted to a default e-mail account or discarded.
1) Click on the Default Address link in the Mail area.

On Default Address Maintenance.

a) Select the domain for which you wish to set up a default address in the combobox “send all unrouted email for“.
b) Click one of the following options:
-
- Forward to email address — Enter the address in the text box.
- Discard with error to sender — Enter an error message for the sender to read.
c) Click the “Change” button.
2) For additional option click on “Advanced Options”.

a) Click the option to “forward to your system account“
b) Forward message to a program : Define a path to the program.
c) Option button “Discard” : Discard incoming messages without an automatic response.
Click “Change” to save entire settings.
Spam Assassin is a mail filter installed on a mail server used to identify Spam, which will automatically filter mails to your domain .
1) To enable Spam Assassin, Click on “Spam Assassin” link in the Mail area.

Click on “Enable Spam Assassin”.

2) To delete spam mails automatically, click on “Auto-Delete Spam”.

Spam Assassin automatically deletes messages that meet or exceed the score limit.So
enabling this feature could cause you to lose email that is not spam,Spam Assasin must be configured properly for your account before using this feature.
3) To disable auto delete spam , click on “Disable Auto-Delete”.

5) To Enable the spam box, click on “Enable Spam Box”.

The spam mail will be sent to an additional folder named “spam”, so by preserving mail that may have mistakenly been filtered by Spam Assasin. To delete the messages in the spam box, click on “Clear Spam Box“.
6) For setting additional configuration, click on “Configure Spam Assasin”.

When you click “Configure Spam Assasin”
- Email can be blacklisted by adding email addresses in the “blacklist_from” text boxes.
- Set required score in the “required_score” text box.
- Set Individual test score in the “score” test box.
- Email can be whitelisted by adding email addresses in the “ whitelist_from” text boxes.
Click on “Save” to save entire setting.
Forwarders allow you to automatically forward e-mails from one account to other account.Forwarded mail will still be delivered to the original address as well.
1) To add forwarders, click on “Forwarders” in Mail.

2) To Add a New Forwarder, click on “Add Forwarder”.
![]()
By clicking this will gone to the section as seen below.
a) Enter the first part of the e-mail address that will be forwarded in the text box “Address to Forward“. Select the correct domain from the drop-down menu.

b) Type the address to which mail should be forwarded in the text box “.
c) Their is an other option “Discard with error to sender” to discard incoming messages and automatically send a failure notice to the sender . The subject of failure notice may entered in “Failure Message”.

c) For advanced forwarder options, click on “Advance Options“.

To forward mail to a system user : Type the appropriate username on the text box “Forward to a system account“.
Forward message to a program : Define a path to the program
Option button “Discard” : Discard incoming messages without sending a failure notice.
Click “Add Forwarder” to save entire settings.
3) To add an email domain forwarder, click on “Add Domain Forwarder”.
A mail sent to a domain can be forwarded to another domain by using email domain forwarders.

By clicking this will gone to the section as seen below.
a) Enter the domain to which you would like to forward email.
b) Click “Add Domain Forwarder”.

 Back to top
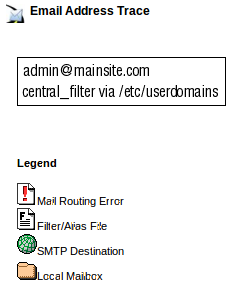