This short article is to give an idea on how you can install latest version of wordpress on your hosting account.
You need to have,
Filezilla click here to get it ( or any other FTP client )
A cPanel hosting account. Get it here
Step 1
Download latest wordpress version. Click here to get it.
Step2
Uncompress latest.zip file.
Step3
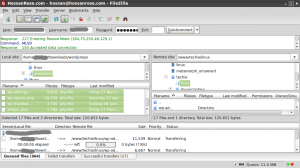
Use Filezilla to upload the uncompressed files to the desired hosting account location. You can upload to public_html or any other location inside.
Step 4
Create database and users with your cPanel, Please see this article,
Step 5
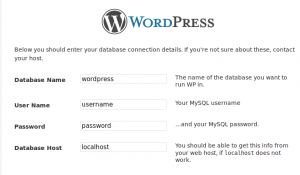
Access the url were wordpress files are uploaded. You will get a screen as below . Click on create a configuration file.
Step 6
Give the database and user details you have created with cPanel on the below step . Click on submit button.
On next screen click on run the install
Step 7
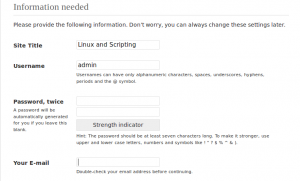
Give site name, user name password and your email address on the next screen and click Install
All set login and go !!!
SSH is often used to login from one system to another without requiring passwords.
The syntax of the ssh-keygen file is as follows:
ssh-keygen -b bits – Specifies the number of bits in the key to create. The minimum bit length is 512 bits and the default length is 2048 bits.
ssh-keygen -p – Requests changing the passphrase of a private key file instead of creating a new private key.
ssh-keygen -t – Specifies the type of key to create.
ssh-keygen -q – Quiets ssh-keygen. It is used by the /etc/rc file while creating a new key.
ssh-keygen -N – Provides a new Passphrase.
The SSH-keygen tool generate a secret key.
Step :
1) Login into a local machine.
2) Take a Terminal (Application/Accessories/Terminal)
3) # ssh-keygen
When we enter “ssh-keygen” in terminal of local machine we get the options like below
The default path of generating the keygen is in /home/user/.ssh/id_rsa.Then press “Enter”.
4)Enter a alphanumeric passphrase you will enter will be used for encrypting your private key, if not press “Enter”.
If you want to create a passphrase type your passphrase once again to confirm it.
After the completion of this the private key is generated.The private key will be saved in .ssh/id_rsa. This file is read-only and only for you. No one else must see the content of that file, as it is used to decrypt all correspondence encrypted with the public key. The public key is save in .ssh/id_rsa.pub.
5)Then public key content of local machine is then copied in file .ssh/authorized_keys of the system you wish to SSH to without being prompted for a password.
scp .ssh/id_rsa.pub user@remote:~/.ssh/authorized_keys
CSF is one of the popular firewall which is based on iptables. CSF can be used and managed with UI of control panels like cPanel, DirectAdmin and Webmin. Here we can see how we can install and do basic configuration of CSF ( ConfigServer Security & Firewall ) & LFD ( Login Failure Daemon ) on a linux server.
How to install ?
For downloading all the csf package.
# cd /usr/local/src/

# wget http://www.configserver.com/free/csf.tgz
Uncompress the packages.
# tar -xvzf csf.tgz
Running the installation script
# cd csf

# sh install.sh
Configuration
a) Main part of configuration is opening up the needed ports
below command will give you an idea of current listening ports and processes in the server
# netstat -pln

# ps aux
find out the ports of services that you want to open and specific them on file /etc/csf/csf.conf with directives
TCP_IN —> incoming TCP ports
TCP_OUT —> outgoing TCP ports
UDP_IN —> incoming UDP ports
UDP_OUT —> outgoing UDP ports
b) Read through the configuration, if you feel everything is okay you can disable testing by setting the first directive on configuration /etc/csf/csf.conf as below
TESTING = 0
restart csf with
# csf -r
Control Panels
CSF currently has UI for cPanel, DirectAdmin and Webmin. No specific installation changes required for cPanel and DirectAdmin, once CSF is installed you can view and manage it with cPanel/DA. You can find webmin CSF module installation instructions here.
Uninstallation
On cPanel servers:
cd /etc/csf
sh uninstall.sh
On DirectAdmin servers:
cd /etc/csf
sh uninstall.directadmin.sh
On generic linux servers:
cd /etc/csf
sh uninstall.generic.sh
Awstats is an advanced graphical statistics software that can be used to analyze the webserver logs. Here we can see how we can install awstats on a linux server with Apache.
Installation
You can get the latest awstats from here. Login to server as root execute the below commands
# cd  /usr/local/

# wget http://sourceforge.net/projects/awstats/files/AWStats/7.0/awstats-7.0.tar.gz

# tar -zxvf awstats-7.0.tar.gz

# mv /usr/local/awstats-7.0 /usr/local/awstats

# cd /usr/local/awstats/tools/

# perl awstats_configure.pl
The above script will ask few questions, detect/modify your apache configuration and will generate an awstats configuration file for the site you specifies.
Configuration
Awstats site configuration file path will be : /etc/awstats/
Name Format of configuration file : awstats.yoursite.com.conf
Open the configuration file with a desired text editor and check, verify and modify the below entries
LogFile —> Log file directive should mention the correct path of the site access log file
SiteDomain —> this directive should mention your domain name
Updating stats
You can update stats with the below command
# /usr/local/awstats/wwwroot/cgi-bin/awstats.pl -update -config=yoursite.com
Add it as a cron to generate the statistics periodically
# crontab -e
0 0 * * * /usr/local/awstats/wwwroot/cgi-bin/awstats.pl -update -config=yoursite.com >/dev/null 2>&1
Securing
To restrict access and to password protect the statistic information add the below lines in your apache configuration
<Files “awstats.pl”>
AuthUserFile /usr/local/awstats/.htpasswd
AuthGroupFile /path/to/.group
AuthName “Restricted Area”
AuthType Basic
require valid-user
</Files>
You need to create a user and password and copy it to the file /usr/local/awstats/.htpasswd to limit the access. Any htpasswd online generator can be used for this, You can find an example one here
restart Apache
/etc/init.d/httpd restart
Accessing
Awstats of the domain can be viewed with the url,
http://your_server_ip/awstats/awstats.pl??config=yoursite.com


