To access Directadmin control Panel : https://<domainname>:2222
Overview
A how to for doing DirectAdmin to DirectAdmin server migration. This can assist you on complete account migration from Oldserver to Newserver , with rsync, sysbackup and manual restoration.
Requirements
- Basic idea of DireactAdmin files and directories
- You must have a new server with DirectAdmin Licensed and installed
- You must make sure that the version of Apache, php and mysql installed on both servers matches
Migration
DirectAdmin does have a utility called System Backup to backup all the needed configuration files and directories in the server, but unfortunately it doesn’t come with a restoration tool. So we will have to do it in the manual way. Home directories will be synced and mysql databases will be backedup and restored separately.
Step 1
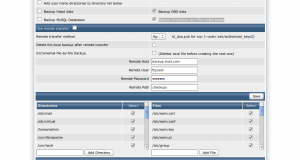
Run System Backup on the old server.
Admin Tools >> System Backup
We will be backuping home directories and mysql db’s manually so Uncheck and unselect the following options on System Backup
Add user home directories to directory list below
Backup httpd data
Backup MySQL Databases
Check and Select
Backup DNS data
Backup Directories and Files listed below
All directories/files listed in bottom section of the System Backup
now click on the Run System Backup Now icon . The backup will be stored mostly in /home/backup ( it will depend upon how you have set it in DA )
Step 2
rsync the system backup to the Newserver.
root@old:~# rsync -avurz -e ssh –delete /home/backup root@Newserver_IP:/home/backup
Step 3
On the Newserver restore the system backups one by one manually.
For example, for restoring your /etc/virtual directory,
root@new:~# cd /etc
root@new:~# tar xvzfp /home/backup/<backup_date>/custom/etc/virtual.tar.gz
Please check here for the complete paths and files used on a DirectAdmin system.
( Do take extra care while restoring /etc/passwd /etc/shadow /etc/group etc.. )
Step 4
Synchronise the home directory
root@old:~# rsync -avurz -e ssh –delete /home root@Newserver_IP:/home
Step 5
Backup and restore the mysql DB’s
On Oldserver
root@old:~# cat /usr/local/directadmin/conf/mysql.conf
Get the da_admin password from the above file
root@old:~# mysqldump -u da_admin -p –all-databases > /root/all_databases.sql
root@old:~# scp /root/all_databases.sql root@Newserver_IP:/root
On Newserver
root@new:~# cat /usr/local/directadmin/conf/mysql.conf
root@new:~# mysql -u da_admin -p < /root/all_databases.sql
Step 6
Use the ipswap script to change the Oldserver IP’s
root@new:~# cd /usr/local/direactadmin/scripts/
root@new:~# ./ipswap.sh Oldserver_IP Newserver_IP
Step 7
Update the nameservers to the Newserver IP’s.
Step 8
To resolve all the queries correctly to the new server . You will have to setup the multi server dns clustering on the new server
Multi Server Setup
on, Add Remote Server
Input the Oldserver IP , login : admin and password
IP:
Port:
SSL:
Username:
Password:
Click Add
next on, List of External Servers
| Zone Transfer: | |
| Domain Check: |
select the server
Click connections “Test Connection(s)” to check the connection.
If the test runs OK, Turn Multi Server On on the top
and run the below to sync the zone files
root@new:~# echo “action=rewrite&value=named” >> /usr/local/directadmin/data/task.queue
Now you’ll be able to access the domains from the new server , do tail the logs to see if everything is fine 🙂


